Figure 9
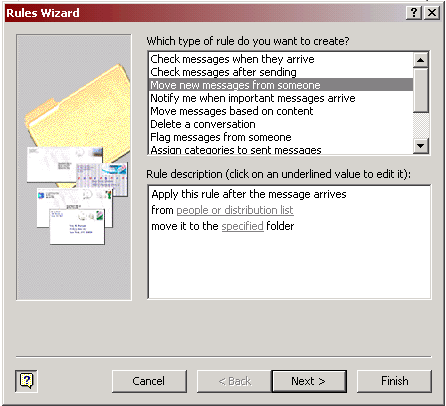
Click New..., this will bring up another Rules Wizard dialog box, shown in Figure 9, that will help you create a new rule. There are several pre-built templates on this screen.
We are going to use the currently selected template: Move new messages from someone. This is the most widely used template and it is good to become acquainted with it.
|
|
|
Figure 9 |
Look in the Rule description area. This is a written-out form of what the rule does. We are going to change the labels to do what we want.
To do this click people or distribution list. This will bring up a dialog box very similar to the one you use when you send people emails from your address book.
Find the name Helpdesk in the name section and then click the From -> button. Also add E-help. These are the two addresses the Helpdesk sends emails from. You should have a dialog box that looks similar to Figure 10 below. Click OK.
Now click the word specified in the Rule Description area of the Rules Wizard dialog box. This will bring up another dialog box, shown in Figure 11, that lets you choose the folder you would like the emails to move to when they arrive. Scroll down until you find the folder named Help Desk that you created earlier. Select it and click OK.
|
|
|
|
Figure 10 |
Figure 11 |
Click Finish on the main Rules Wizard window.
Now whenever email arrives that is from the Helpdesk it will automatically be moved to the Help Desk folder.
Note: If you chose a folder that is on the Exchange Server (i.e. not in your Personal Folders) you do not have to have Outlook open for rules to be processed. The rules will happen on the server and the emails will already be sorted when you open Microsoft Outlook.
Step 5: Use the Rules Wizard |
Conclusion |