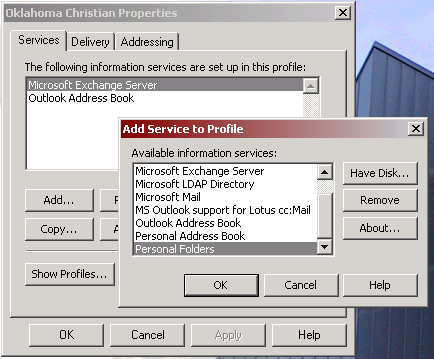
Figure 3 shows the Outlook Profile dialog box. To create the Personal Folder click Add.... This will bring up the Add Service dialog box. Now choose Personal Folders File under Types of Information Services and click OK.
|
|
| Figure 3 |
You now have to decide where to save the Personal Folder file. If you are using a desktop computer we recommend you place the file on your H: drive.
If you are using a laptop computer you will probably want to save it on your C: Drive. If you save the file on your H: drive you will not be able to access your Personal Folder when you are away from the campus unless you VPN or dialup to campus. If you do choose to save the file on your C: drive remember to backup this file regularly. A good place on your C: drive is your My Documents folder.
To save the Personal Folder file, expand the drop down box next to Save in: and choose the appropriate drive letter or My Documents folder and click OK. Refer to figure 4 to see an example.
Note: If you already have a Personal Folder that you would like to add to Outlook browse to it and click OK.
|
|
|
Figure 4 |
To continue, click OK on the Create Microsoft Personal Folders screen (these are advanced options and will be covered in future How-To documents). Click Close to exit the Outlook Data Files dialog box.
Step 2: Open Profile Management Dialog |
Step 4: Use the Personal Folder |
